Saturday, January 24, 2009

Perl - simple log-filter script

Lets say we are having a log file in the following format (/var/log/messages format):
Jan 25 00:08:33 localhost kernel: imklog 3.21.9, log source = /proc/kmsg started.
Jan 25 00:08:33 localhost rsyslogd: [origin software="rsyslogd" swVersion="3.21.9" ] restart

Here how to write a simple perl script which will print the log file using a filter (in this sample I will filter the file by its modules : kernel, rsyslogd).

Script start:

#!/usr/bin/perl

# Log file name
$FILE_NAME="messages.txt";

sub read_from_file()
{
# The first (and only) parameter in the module filter string
$MODULE_FILTER=$_[0];

# Open the file for reading, if cannot - exit
open (FHANDLE, "< ${FILE_NAME} ") || die "couldn't open the ${FILE_NAME} file!";

# Reading the file
while ()
{
# Parse the line into its parts using regular expressions
($date,$hostname,$module,$msg) = /^(.+?\s.+?\s.+?\s)(.+?\s)(.+?:\s)(.*)/;
# If ((the filter is not "ANY") and ( current line do not match the filter, in this sample - ignore case)) skip current line
unless (( ${MODULE_FILTER} eq "ANY" ) || ( ${module} =~ /${MODULE_FILTER}/i ))
{
next;
}
# print current line
print $_;
}
# close file handle
close ${FHANDLE}
}

##########################################################
## Main
#&read_from_file("ANY");
#&read_from_file("KERNEL");
Script End;

If I'm calling the subroutine with the "ALL" filter, I will see all the file.
If I will call with the "KERNEL" filter, I will only see the first line.


Tuesday, January 20, 2009

Building Fedora 10 kernel

_debug_compile
Preaparing the build environment:
In order to create the file system environment we need to run the following command where we want to build the kernel (If missing, install package rpmdevtools):
#/usr/bin/rpmdev-setuptree

Now, We are having the rpmbuild directory which contain the following directories : BUILD, RPMS, SOURCES, SPECS and SRPMS.

Note: the rpmdevtools was changed between fedora 9 and 10, in 9 we had to call fedora-buildrpmtree.
Other note: Some of the operations required root permissions, you can run it
as root or use "su", just remember that the rpmbuild directory is expected in the current user home directory and pay attention to the directory permission.

To set the build in a specific path (e.g. ~/rpmbuild) add the following to the ~/.rpmmacros file:
%_topdir %(echo $HOME)/rpmbuild #path to your custom
build dir

Download and install the kernel source:
Now, we should downoad the kernel source from http://kojipkgs.fedoraproject.org/packages/kernel, since my kernel version is 2.6.27.9-159.fc10.i686 I will download the file kernel-2.6.27.9-159.fc10.src.rpm

After the download completed, extract the rpm by typing (you can ignore the "warning: group mockbuild does not exist - using root" messages):
#rpm -ivh kernel-2.6.27.9-159.fc10.src.rpm

Preparing the build (in my case, for i686):
#cd rpmbuild/SPECS
#rpmbuild -bp --target=i686 kernel.spec

Building the kernel rpm:
Note: For this sample, I will build the kernel without any configuration changes.

Go to the build directory and start the rpm build.
#cd rpmbuild/BUILD/kernel-2.6.27/linux-2.6.27.i686
#make rpm
This is going to take some time .....

Creating the ram disk:
initrd image creation:
Since the mkinitrd function searching the built modules under /lib/modules/, I created a soft link from there to the place we have built the modules
(there must be more elegant way ...)
#cd /lib/modules/
# ln -s <build path>/rpmbuild/BUILDROOT/kernel-2.6.27.9-1.i386/lib/modules/2.6.27.9 2.6.27.9
#cd <build path>/rpmbuild/BUILDROOT/kernel-.6.27.9-1.i386/boot
#mkinitrd /boot/initrd-2.6.27.9.img 2.6.27.9

Installing the new kernel:
Now, We need to copy the generated files from the <build path>rpmbuild/BUILDROOT/kernel-2.6.27.9-1.i386/boot
directory to the /boot directory in the target machine:
initrd-2.6.27.9.img,System.map-2.6.27.9,vmlinuz-2.6.27.9,config-2.6.27.9

In the /etc/grub.conf file we need to add
an entry for the new kernel:
title myBuild (2.6.27.9)
root (hd0,0)
kernel /boot/ofer/vmlinuz-2.6.27.9 ro root=UUID=<your uuid> rhgb quiet
initrd /boot/ofer/initrd-2.6.27.9.img

Reboot the machine, choose the new kernel in the grub screen, and that it :-)


Sunday, January 18, 2009

vmware tools for fedora 10

The vmware tools (VmwareTools-6.5.0-118166) installation went surprisingly fast (including the kernel modules compilation using vmware-config-tools.pl script) on the fedora 10 kernel version 2.6.27.9-159.fc10.i686 except two issues:


During the X server configuration, I received an error which indicate that the vmware tools cannot locate the monitor, its seems like vmware looking for Xorg instead of Xfree86.
In order to bypass this issue we should create the following /etc/X11/xorg.conf (as root):
Section "Monitor"
Identifier "vmware"
EndSection
And re-run the config tool.

The second problem was the “drug-and-drop”, IT DIDN'T WORK !!!, to fix it call /usr/bin/vmware-user as written in “http://www.virtuatopia.com/index.php/Understanding_and_Installing_VMware_Tools:
"You will need to either manually start /usr/bin/vmware-user or log out and log
back in to this desktop session to obtain the following features: guest
resolution fit, drag and drop, and file and text copy/paste. vmware-user is
configured to automatically start at a graphical login, but that won't take
effect until the next login."


If needed, Call the vmware-user every login using the application start-up list.

Activate conky upon startup

While using conky we can make it start with our system, The easiest way is to add it to the session.

Go to : System > Preferences > Personal -> Sessions -> “Startup Programs” , and add the conky to the additional startup progam list.

After the X server start, You will see something weird, the conky appear on the screen and then disappear under the background image, The problem is that the conky is starting to fast before the rest of the desktop component.

In order to fix it we will “tell” the conky to wait a while before starting ,create the following bash script conky_start:
#!/bin/bash
sleep 10
conky &
exit 0

Change it permission to execute:
#chmod 755 /usr/bin/conky_start

Try to launch it manually to make sure you don't have any typo and change the session startup-programs to launch this script instead of conky.


Tuesday, December 16, 2008

Linux Kernel Module Debugging – GDB setup


I will explain how to debug my own loadable kernel module with remote debugging.

First we need to tell the gdb we are using remote debugging, in case of Ethernet we need to set the debugee IP and port (i.e. target remote localhost:8832), If we are using serial , this will be the commands:
(gdb)set remotebaud 115200
(gdb)target remote /dev/ttyS0

I will use the “hello world” module we have created(hello-world-kernel-module) for this demonstration.

We need to install the compiled module in our guest machine, so copy it to the machine and type:
# insmod hello.ko
(We can verify the insmod by seeking the output in the “/var/log/messages/ file, please refer to the “hello world” post).

Now, we need to add our module's symbols into the debugger, we will need to know the address of our module after we load it into the kernel.
The module start address can be found using the following command on our guest machine (after the insmod):
# cat /sys/module/hello/sections/.text
0xd0b1a000
(<-- my guest output)
# cat /sys/module/hello/sections/.data
0xd0b1a38c
(<-- my guest output)
# cat /sys/module/hello/sections/.bss
0xd0b1b580
(<-- my guest output)

After the gdb was connected to the target, We inform it our module offset (the compiled kernel is located at : /home/ofer/hello.ko):
(gdb)add-symbol-file /home/ofer/hello.ko 0xd0b1a000 -s .data 0xd0b1a38c -s .bss 0xd0b1b580

Now I will add breakpoint to the module function:
(gdb)b hello_func
and I will receive the following answer in the gdb output window:
Breakpoint 1 at 0xd0b1a003: file /home/ofer/hello.ko, line 10.

In order to call this function, I will remove the module from the guest console and re-insmod it (which invoke the hello_func function):
# rmmod hello
# insmod hello.ko
The gdb will stop in the required function and we can debug the code.


Saturday, November 15, 2008

Prepare and debug linux kernel with vmware 6

Vmware 6 includes kernel-debugging option which can replaced the kdb usage, Here's some explanation of this process:


The kernel source preparation:

Before the debugging we will have to prepare the source code and the debug image of the “debugged” kernel.


In my target machine (Inside the VMware) I'm using linux kernel 2.6.25.9-76.fc9.i686, first we will need to download the source code of this version and the vmlinux image file with debug symbols.
Thedownload location for this release is :
http://kojipkgs.fedoraproject.org/packages/kernel/2.6.25.9/76.fc9/
,
From there I downloaded the following files:

  • i686/kernel-devel-2.6.25.9-76.fc9.i686.rpm

  • i686/kernel-debuginfo-common-2.6.25.9-76.fc9.i686.rpm

  • i686/kernel-debuginfo-2.6.25.9-76.fc9.i686.rpm

  • src/kernel-2.6.25.9-76.fc9.src.rpm


Next, we need to install those packages, but before, We need to create the build directory tree for the source, The next command will create the SOURCES, SPECS and BUILD directories under ${HOME}/rpmbuild
#rpmdev-setuptree
Package installation (root user) :
# rpm -i <the packages>

Now, we need to prepare the source directories with all the patches:


# cd ~/rpmbuild/SPECS
# rpmbuild -bp --target=`uname -m` kernel.spec

The VMware 6 preparation:

Open the VMware configuration file (/etc/vmware/config) and add the following line:

debugStub.listen.guest32=1

Now, We will see the following line in the vmware log file, which mean that we are ready for debug:


VMware Workstation is listening for debug connection on port 8832.

The GDB preparation:

Instead of running the gdb with all the debugging arguments every time, we can edit the .gdbinit file with the initial configuration,
This file should be located either in the current directory or in the
home directory.
Add to the .gdbinit the following line to determine the file to launch:
file /usr/lib/debug/lib/modules/2.6.25.9-76.fc9.i686/vmlinux

Add the .gdbinit the following line in order to tell gdb to connect the remote host:


target remote localhost:8832

Now we will configure the source-code directories, After the previous
steps, the source code is located under ${HOME}/rpmbuild/BUILD/kernel-2.6.25/linux-2.6.25.i686 , to automatically insert all the sub directories, run the following command on bash:

#for file in `find ~/rpmbuild/BUILD/kernel-2.6.25/linux-2.6.25.i686 -type d`; do echo dir $file;done >> ~/.gdbinit

Debugging !!!

Now, all we need to do is to type
#gdb
(or ddd) In order to launch the debugger.


One issue I faced is that if I'm pausing the vmware guest machne to long, its shut down and I need to restart the guest OS again, still need to figure out this one ........

Wednesday, November 5, 2008

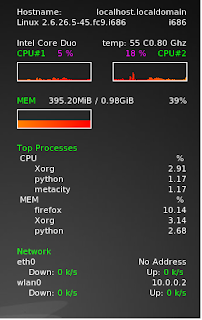
Display system information on desktop using Conky

Hi,
For those of you who want to know your machine performance while running your Linux, There is a very good system monitor for the X system which called Conky.

Conky can display almost all the information you needed on the desktop.
I downloaded it using yum :
#yum install Conky

But you can download it from its formal web as well :
http://conky.sourceforge.net/

In order to display the information you see on the attached image the ~/.conkyrc file should be as followed:


# Conky sample configuration

# set to yes if you want Conky to be forked in the background
background yes

# Use Xft?
use_xft yes

# Xft font when Xft is enabled
xftfont xirod:size=9

# Text alpha when using Xft
xftalpha 0.8

# mail spool
mail_spool $MAIL

# Update interval in seconds
update_interval 2.5

# This is the number of times Conky will update before quitting.
# Set to zero to run forever.
total_run_times 0

# Create own window instead of using desktop (required in nautilus)
own_window 1

# If own_window is yes, you may use type normal, desktop or override
own_window_type override

# Use pseudo transparency with own_window?
own_window_transparent 1

# If own_window_transparent is set to no, you can set the background colour here
own_window_colour hotpink

# If own_window is yes, these window manager hints may be used
#own_window_hints undecorated,below,sticky,skip_taskbar,skip_pager

# Use double buffering (reduces flicker, may not work for everyone)
double_buffer yes

# Minimum size of text area
minimum_size 280 5

maximum_width 230

# Draw shades?
draw_shades no

# Draw outlines?
draw_outline no

# Draw borders around text
draw_borders no

# Draw borders around graphs
draw_graph_borders yes

# Stippled borders?
stippled_borders 8

# border margins
border_margin 4

# border width
border_width 1

# Default colors and also border colors
default_color white

# Text alignment, other possible values are commented
#alignment top_left
alignment top_right
#alignment bottom_left
#alignment bottom_right
#alignment none

# Gap between borders of screen and text
# same thing as passing -x at command line
gap_x 20
gap_y 15

# Subtract file system buffers from used memory?
no_buffers yes

# set to yes if you want all text to be in uppercase
uppercase no

# number of cpu samples to average
# set to 1 to disable averaging
cpu_avg_samples 2

# number of net samples to average
# set to 1 to disable averaging
net_avg_samples 2

# Force UTF8? note that UTF8 support required XFT
override_utf8_locale no

# Add spaces to keep things from moving about? This only affects certain objects.
use_spacer none

# Allow each port monitor to track at most this many connections (if 0 or not set, default is 256)
#max_port_monitor_connections 256

# Maximum number of special things, e.g. fonts, offsets, aligns, etc.
#max_specials 512

# Maximum size of buffer for user text, i.e. below TEXT line.
#max_user_text 16384

# variable is given either in format $variable or in ${variable}. Latter
# allows characters right after the variable and must be used in network
# stuff because of an argument

# stuff after 'TEXT' will be formatted on screen

TEXT
Hostname:$alignr$nodename
$sysname $kernel $alignr $machine

Intel Core Duo $alignr temp: $acpitemp C$alignr${freq_g cpu2} Ghz
${color green}CPU#1 ${color white}${cpu cpu1} %${alignr}${cpu cpu2} %${color green} CPU#2
${color white}${cpugraph cpu1 25,100 FF8200 ff0000} ${alignr}${cpugraph cpu2
25,100 FF0000 FF9900}$color

${color green}MEM$color $alignc $mem / $memmax $alignr $memperc%
${color white}${memgraph cpu1 25,100 FF8200 ff0000}$color

${color green}Top Processes$color
CPU $alignr %
${top name 1}$alignr${top cpu 1}
${top name 2}$alignr${top cpu 2}
${top name 3}$alignr${top cpu 2}
MEM $alignr %
${top_mem name 1}$alignr${top_mem mem 1}
${top_mem name 2}$alignr${top_mem mem 2}
${top_mem name 3}$alignr${top_mem mem 3}

${color green}Network$color
eth0 $alignr ${addr eth0}
${color white}Down: ${color green}${downspeed eth0} k/s ${alignr}${color white}Up:${color green} ${upspeed eth0} k/s $color
wlan0 $alignr ${addr wlan0}
${color white}Down: ${color green}${downspeed wlan0} k/s ${alignr}${color white}Up:${color green} ${upspeed wlan0} k/s