Tuesday, December 16, 2008

Linux Kernel Module Debugging – GDB setup


I will explain how to debug my own loadable kernel module with remote debugging.

First we need to tell the gdb we are using remote debugging, in case of Ethernet we need to set the debugee IP and port (i.e. target remote localhost:8832), If we are using serial , this will be the commands:
(gdb)set remotebaud 115200
(gdb)target remote /dev/ttyS0

I will use the “hello world” module we have created(hello-world-kernel-module) for this demonstration.

We need to install the compiled module in our guest machine, so copy it to the machine and type:
# insmod hello.ko
(We can verify the insmod by seeking the output in the “/var/log/messages/ file, please refer to the “hello world” post).

Now, we need to add our module's symbols into the debugger, we will need to know the address of our module after we load it into the kernel.
The module start address can be found using the following command on our guest machine (after the insmod):
# cat /sys/module/hello/sections/.text
0xd0b1a000
(<-- my guest output)
# cat /sys/module/hello/sections/.data
0xd0b1a38c
(<-- my guest output)
# cat /sys/module/hello/sections/.bss
0xd0b1b580
(<-- my guest output)

After the gdb was connected to the target, We inform it our module offset (the compiled kernel is located at : /home/ofer/hello.ko):
(gdb)add-symbol-file /home/ofer/hello.ko 0xd0b1a000 -s .data 0xd0b1a38c -s .bss 0xd0b1b580

Now I will add breakpoint to the module function:
(gdb)b hello_func
and I will receive the following answer in the gdb output window:
Breakpoint 1 at 0xd0b1a003: file /home/ofer/hello.ko, line 10.

In order to call this function, I will remove the module from the guest console and re-insmod it (which invoke the hello_func function):
# rmmod hello
# insmod hello.ko
The gdb will stop in the required function and we can debug the code.


Saturday, November 15, 2008

Prepare and debug linux kernel with vmware 6

Vmware 6 includes kernel-debugging option which can replaced the kdb usage, Here's some explanation of this process:


The kernel source preparation:

Before the debugging we will have to prepare the source code and the debug image of the “debugged” kernel.


In my target machine (Inside the VMware) I'm using linux kernel 2.6.25.9-76.fc9.i686, first we will need to download the source code of this version and the vmlinux image file with debug symbols.
Thedownload location for this release is :
http://kojipkgs.fedoraproject.org/packages/kernel/2.6.25.9/76.fc9/
,
From there I downloaded the following files:

  • i686/kernel-devel-2.6.25.9-76.fc9.i686.rpm

  • i686/kernel-debuginfo-common-2.6.25.9-76.fc9.i686.rpm

  • i686/kernel-debuginfo-2.6.25.9-76.fc9.i686.rpm

  • src/kernel-2.6.25.9-76.fc9.src.rpm


Next, we need to install those packages, but before, We need to create the build directory tree for the source, The next command will create the SOURCES, SPECS and BUILD directories under ${HOME}/rpmbuild
#rpmdev-setuptree
Package installation (root user) :
# rpm -i <the packages>

Now, we need to prepare the source directories with all the patches:


# cd ~/rpmbuild/SPECS
# rpmbuild -bp --target=`uname -m` kernel.spec

The VMware 6 preparation:

Open the VMware configuration file (/etc/vmware/config) and add the following line:

debugStub.listen.guest32=1

Now, We will see the following line in the vmware log file, which mean that we are ready for debug:


VMware Workstation is listening for debug connection on port 8832.

The GDB preparation:

Instead of running the gdb with all the debugging arguments every time, we can edit the .gdbinit file with the initial configuration,
This file should be located either in the current directory or in the
home directory.
Add to the .gdbinit the following line to determine the file to launch:
file /usr/lib/debug/lib/modules/2.6.25.9-76.fc9.i686/vmlinux

Add the .gdbinit the following line in order to tell gdb to connect the remote host:


target remote localhost:8832

Now we will configure the source-code directories, After the previous
steps, the source code is located under ${HOME}/rpmbuild/BUILD/kernel-2.6.25/linux-2.6.25.i686 , to automatically insert all the sub directories, run the following command on bash:

#for file in `find ~/rpmbuild/BUILD/kernel-2.6.25/linux-2.6.25.i686 -type d`; do echo dir $file;done >> ~/.gdbinit

Debugging !!!

Now, all we need to do is to type
#gdb
(or ddd) In order to launch the debugger.


One issue I faced is that if I'm pausing the vmware guest machne to long, its shut down and I need to restart the guest OS again, still need to figure out this one ........

Wednesday, November 5, 2008

Display system information on desktop using Conky

Hi,
For those of you who want to know your machine performance while running your Linux, There is a very good system monitor for the X system which called Conky.

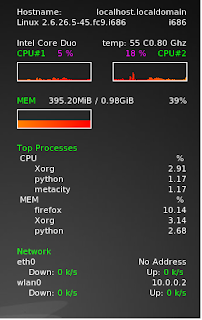
Conky can display almost all the information you needed on the desktop.
I downloaded it using yum :
#yum install Conky

But you can download it from its formal web as well :
http://conky.sourceforge.net/

In order to display the information you see on the attached image the ~/.conkyrc file should be as followed:


# Conky sample configuration

# set to yes if you want Conky to be forked in the background
background yes

# Use Xft?
use_xft yes

# Xft font when Xft is enabled
xftfont xirod:size=9

# Text alpha when using Xft
xftalpha 0.8

# mail spool
mail_spool $MAIL

# Update interval in seconds
update_interval 2.5

# This is the number of times Conky will update before quitting.
# Set to zero to run forever.
total_run_times 0

# Create own window instead of using desktop (required in nautilus)
own_window 1

# If own_window is yes, you may use type normal, desktop or override
own_window_type override

# Use pseudo transparency with own_window?
own_window_transparent 1

# If own_window_transparent is set to no, you can set the background colour here
own_window_colour hotpink

# If own_window is yes, these window manager hints may be used
#own_window_hints undecorated,below,sticky,skip_taskbar,skip_pager

# Use double buffering (reduces flicker, may not work for everyone)
double_buffer yes

# Minimum size of text area
minimum_size 280 5

maximum_width 230

# Draw shades?
draw_shades no

# Draw outlines?
draw_outline no

# Draw borders around text
draw_borders no

# Draw borders around graphs
draw_graph_borders yes

# Stippled borders?
stippled_borders 8

# border margins
border_margin 4

# border width
border_width 1

# Default colors and also border colors
default_color white

# Text alignment, other possible values are commented
#alignment top_left
alignment top_right
#alignment bottom_left
#alignment bottom_right
#alignment none

# Gap between borders of screen and text
# same thing as passing -x at command line
gap_x 20
gap_y 15

# Subtract file system buffers from used memory?
no_buffers yes

# set to yes if you want all text to be in uppercase
uppercase no

# number of cpu samples to average
# set to 1 to disable averaging
cpu_avg_samples 2

# number of net samples to average
# set to 1 to disable averaging
net_avg_samples 2

# Force UTF8? note that UTF8 support required XFT
override_utf8_locale no

# Add spaces to keep things from moving about? This only affects certain objects.
use_spacer none

# Allow each port monitor to track at most this many connections (if 0 or not set, default is 256)
#max_port_monitor_connections 256

# Maximum number of special things, e.g. fonts, offsets, aligns, etc.
#max_specials 512

# Maximum size of buffer for user text, i.e. below TEXT line.
#max_user_text 16384

# variable is given either in format $variable or in ${variable}. Latter
# allows characters right after the variable and must be used in network
# stuff because of an argument

# stuff after 'TEXT' will be formatted on screen

TEXT
Hostname:$alignr$nodename
$sysname $kernel $alignr $machine

Intel Core Duo $alignr temp: $acpitemp C$alignr${freq_g cpu2} Ghz
${color green}CPU#1 ${color white}${cpu cpu1} %${alignr}${cpu cpu2} %${color green} CPU#2
${color white}${cpugraph cpu1 25,100 FF8200 ff0000} ${alignr}${cpugraph cpu2
25,100 FF0000 FF9900}$color

${color green}MEM$color $alignc $mem / $memmax $alignr $memperc%
${color white}${memgraph cpu1 25,100 FF8200 ff0000}$color

${color green}Top Processes$color
CPU $alignr %
${top name 1}$alignr${top cpu 1}
${top name 2}$alignr${top cpu 2}
${top name 3}$alignr${top cpu 2}
MEM $alignr %
${top_mem name 1}$alignr${top_mem mem 1}
${top_mem name 2}$alignr${top_mem mem 2}
${top_mem name 3}$alignr${top_mem mem 3}

${color green}Network$color
eth0 $alignr ${addr eth0}
${color white}Down: ${color green}${downspeed eth0} k/s ${alignr}${color white}Up:${color green} ${upspeed eth0} k/s $color
wlan0 $alignr ${addr wlan0}
${color white}Down: ${color green}${downspeed wlan0} k/s ${alignr}${color white}Up:${color green} ${upspeed wlan0} k/s

Sunday, October 26, 2008

"Hello World" kernel module

An Environment notes:
My kernel's module test environment is fedora core 9 with kernel version of 2.6.25.9-76.
In order to compile my module I had to download the development package of this kernel version and install it on my build/debug machine : http://kojipkgs.fedoraproject.org/packages/kernel/2.6.25.9/76.fc9/i686/

Now, the module source code :

// Start of code

#include <linux/init.h>

#include <linux/module.h>

// The following macro's can be found at the kernel include file linux/module.h
// with some other as MODULE_INFO, MODULE_ALIAS, MODULE_VERSION ....

MODULE_LICENSE("DUAL BSD/GPL"); // license applies to its code
MODULE_AUTHOR("Ofer Koren"); // Code author
MODULE_DESCRIPTION("hello-world module"); // Module description

// My “started” print function

void hello_func(void)
{
printk (KERN_ALERT "Hello World strated :-]\n");
}

// Module's initialization function
// The __init mean that this function can be dropped from the memory
// after the module is loaded

static int __init start_hello(void)
{
hello_func();
return 0;
}

// Module's exit function
// The __exit mean that this code should be called upon module exit only
static void __exit stop_hello(void)
{
printk(KERN_ALERT "Hello-world was terminated\n");
}

// The next two macros are mandatory, this way we declare
// our init and exit functions
module_init(start_hello);
module_exit(stop_hello);

// End of code


Some notes regarding printk:

printk is actually the “printf” of the kernel space (which we cannot use since the kernel ir running without the C libs), For each printk calling we can declare the output priority using the following defines in the kernel.h header:

#define KERN_EMERG      "<0>"   /* system is unusable                   */

#define KERN_ALERT "<1>" /* action must be taken immediately */
#define KERN_CRIT "<2>" /* critical conditions */
#define KERN_ERR "<3>" /* error conditions */
#define KERN_WARNING "<4>" /* warning conditions */
#define KERN_NOTICE "<5>" /* normal but significant condition */
#define KERN_INFO "<6>" /* informational */
#define KERN_DEBUG "<7>" /* debug-level messages */
In order to compile the above code, Here's the Makefile:

#Start of Makefile

# The sourc file to compile
obj-m += hello.o
# The kernel header files
KERNELDIR=/usr/src/kernels/2.6.25.9-76.fc9.i686
# Current directory
PWD= $(shell pwd)
# Make command
MAKE=make

all:
$(MAKE) -C $(KERNELDIR) M=$(PWD) modules
clean:
$(MAKE) -C $(KERNELDIR) M=$(PWD) clean

# Since the make start by changing the current directory to the KERNELDIR
# path, The M option cause the makefile to move back to our directory before
# its trying to build out module.

#End of Makefile


Module installation:

Since the only thing our module is (currently) doing is to print its message, we will try to install it and capture its outputs, this can be done using the dmesg function or going directly to the /var/log/messages file (I'm usually running the “tail -f /var/log/messages” command on separate console) , now when we will install the module (go to the file location and type “insmod hello.ko”), We will see the following output :
Hello World strated :-]

and while removing the module (“rmmod hello”):
Hello-world was terminated


Tuesday, August 19, 2008

How to extract iso file with bash shell script

Hi,
Few days ago, I faced a problem, I needed to extract an iso file but did't have the appropriate permission for "looping" it :
mkdir -p /mnt/disk
mount -o loop disk1.iso /mnt/disk

So , I had to write a shell script which extract the iso file to a destination directory.
(There might be an easiest way to do this, But this was my way)

Please let me introduce you the "isoinfo" command.
I will use only two options of it:
isoinfo -R -l : List all the iso files in hierarchic way , For example:

#> isoinfo -R -l -i RHEL4-U4-i386-ES-disc5.iso
Will reproduce:
....
Directory listing of /RedHat/
drwxrwxr-x 3 0 0 2048 Aug 3 2006 [ 29 02] .
drwxrwxr-x 3 0 0 2048 Aug 3 2006 [ 28 02] ..
drwxrwxr-x 2 0 0 20480 Aug 3 2006 [ 30 02] RPMS
-r--r--r-- 1 0 0 216 Aug 3 2006 [ 65 00] TRANS.TBL

Directory listing of /RedHat/RPMS/
drwxrwxr-x 2 0 0 20480 Aug 3 2006 [ 30 02] .
drwxrwxr-x 3 0 0 2048 Aug 3 2006 [ 29 02] ..
-r--r--r-- 1 0 0 25312 Aug 3 2006 [ 66 00] TRANS.TBL
-rw-r--r-- 63 0 0 2423867 Jul 28 2006 [ 79 00] evolution-devel-2.0.2-27.rhel4.6.i386.rpm
-rw-r--r-- 193 0 0 27768 Jun 7 2005 [ 1263 00] gedit-devel-2.8.1-4.i386.rpm
-rw-r--r-- 196 0 0 24491673 Jan 5 2005 [ 1277 00] gimp-print-cups-4.2.7-2.i386.rpm
-rw-r--r-- 197 0 0 565998 Jan 5 2005 [ 13236 00] gimp-print-devel-4.2.7-2.i386.rpm
-rw-r--r-- 196 0 0 12706 Jan 5 2005 [ 13513 00] gnome-python2-applet-2.6.0-3.i386.rpm
-rw-r--r-- 196 0 0 23924 Jan 5 2005 [ 13520 00] gnome-python2-gconf-2.6.0-3.i386.rpm
.....

And to extract a specific file from the iso:
isoinfo -R -i -x

Now, Lets go to the script:

First, the interpreter :
#!/bin/bash

# Now, Some global defines
ISO_FILE="disk1.iso"
ISO_INFO="isoinfo"
OUT_DIR="./kickstart"
TMP_FILES="./files.tmp"
DIR_PREFIX="Directory listing of "

# Save all the files tree in tmp log file
${ISO_INFO} -R -l -i ${ISO_FILE} > ${TMP_FILES}

# If the output dir already exist, remove it
if [ -e ${OUT_DIR} ]
then
\rm -rf ${OUT_DIR}
fi

# Read the file tree line by line
exec< ${TMP_FILES}
while read node
do
# If line not empty
if [ -n "$node" ]
then
# If line starts with "Directory listing of", Its a directory, see output sample above
if [[ $node == "${DIR_PREFIX}"* ]]
then
# Remove the "Directory listing of " prefix
dir=`echo $node | sed s/"${DIR_PREFIX}"//g`
# And create the directory under the OUT_DIR directory
# mkdir -p = make parent directories as needed (from the man page)
mkdir -p ${OUT_DIR}/$dir
else
# As you can see in the output sample above, both files and directories are listed together,
# the directories can be identified by the first letter in its attribute columns "d", So I will ignore
# them since we handled directories in the previous case
if [[ $node != "d"* ]]
then
# File
file=`echo $node | cut -d" " -f12`
# Actually, I don't need to recheck again the "." and ".." directory, But, Just in case
if [ $file != "." -a $file != ".." ]
then
# Create full file path
filepath=$dir$file
# Create the file
touch ${OUT_DIR}/${filepath}
# Extract the file to its location
${ISO_INFO} -R -i ${ISO_FILE} -x ${filepath} > ${OUT_DIR}/${filepath}
fi
fi
fi
fi
done

# If exist, remove the temporary files list
if [ -f ${TMP_FILES} ]
then
\rm -rf ${TMP_FILES}
fi

Well, There are much more things to add for this script (for example : status checking here and there), But the main functionality is here.

Ofer.

Monday, August 18, 2008

The Grand opening :-)

Hi,
I have just created the Blog, Wanted to see what is all about, Now, I need to start gathering materials for this .......