Hi,
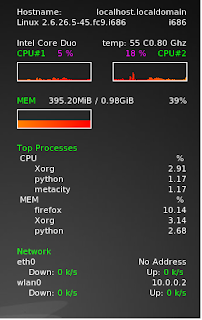
For those of you who want to know your machine performance while running your Linux, There is a very good system monitor for the X system which called Conky.
Conky can display almost all the information you needed on the desktop.
I downloaded it using yum :
#yum install Conky
But you can download it from its formal web as well :
http://conky.sourceforge.net/In order to display the information you see on the attached image the ~/.conkyrc file should be as followed:
# Conky sample configuration
# set to yes if you want Conky to be forked in the background
background yes
# Use Xft?
use_xft yes
# Xft font when Xft is enabled
xftfont xirod:size=9
# Text alpha when using Xft
xftalpha 0.8
# mail spool
mail_spool $MAIL
# Update interval in seconds
update_interval 2.5
# This is the number of times Conky will update before quitting.
# Set to zero to run forever.
total_run_times 0
# Create own window instead of using desktop (required in nautilus)
own_window 1
# If own_window is yes, you may use type normal, desktop or override
own_window_type override
# Use pseudo transparency with own_window?
own_window_transparent 1
# If own_window_transparent is set to no, you can set the background colour here
own_window_colour hotpink
# If own_window is yes, these window manager hints may be used
#own_window_hints undecorated,below,sticky,skip_taskbar,skip_pager
# Use double buffering (reduces flicker, may not work for everyone)
double_buffer yes
# Minimum size of text area
minimum_size 280 5
maximum_width 230
# Draw shades?
draw_shades no
# Draw outlines?
draw_outline no
# Draw borders around text
draw_borders no
# Draw borders around graphs
draw_graph_borders yes
# Stippled borders?
stippled_borders 8
# border margins
border_margin 4
# border width
border_width 1
# Default colors and also border colors
default_color white
# Text alignment, other possible values are commented
#alignment top_left
alignment top_right
#alignment bottom_left
#alignment bottom_right
#alignment none
# Gap between borders of screen and text
# same thing as passing -x at command line
gap_x 20
gap_y 15
# Subtract file system buffers from used memory?
no_buffers yes
# set to yes if you want all text to be in uppercase
uppercase no
# number of cpu samples to average
# set to 1 to disable averaging
cpu_avg_samples 2
# number of net samples to average
# set to 1 to disable averaging
net_avg_samples 2
# Force UTF8? note that UTF8 support required XFT
override_utf8_locale no
# Add spaces to keep things from moving about? This only affects certain objects.
use_spacer none
# Allow each port monitor to track at most this many connections (if 0 or not set, default is 256)
#max_port_monitor_connections 256
# Maximum number of special things, e.g. fonts, offsets, aligns, etc.
#max_specials 512
# Maximum size of buffer for user text, i.e. below TEXT line.
#max_user_text 16384
# variable is given either in format $variable or in ${variable}. Latter
# allows characters right after the variable and must be used in network
# stuff because of an argument
# stuff after 'TEXT' will be formatted on screen
TEXT
Hostname:$alignr$nodename
$sysname $kernel $alignr $machine
Intel Core Duo $alignr temp: $acpitemp C$alignr${freq_g cpu2} Ghz
${color green}CPU#1 ${color white}${cpu cpu1} %${alignr}${cpu cpu2} %${color green} CPU#2
${color white}${cpugraph cpu1 25,100 FF8200 ff0000} ${alignr}${cpugraph cpu2
25,100 FF0000 FF9900}$color
${color green}MEM$color $alignc $mem / $memmax $alignr $memperc%
${color white}${memgraph cpu1 25,100 FF8200 ff0000}$color
${color green}Top Processes$color
CPU $alignr %
${top name 1}$alignr${top cpu 1}
${top name 2}$alignr${top cpu 2}
${top name 3}$alignr${top cpu 2}
MEM $alignr %
${top_mem name 1}$alignr${top_mem mem 1}
${top_mem name 2}$alignr${top_mem mem 2}
${top_mem name 3}$alignr${top_mem mem 3}
${color green}Network$color
eth0 $alignr ${addr eth0}
${color white}Down: ${color green}${downspeed eth0} k/s ${alignr}${color white}Up:${color green} ${upspeed eth0} k/s $color
wlan0 $alignr ${addr wlan0}
${color white}Down: ${color green}${downspeed wlan0} k/s ${alignr}${color white}Up:${color green} ${upspeed wlan0} k/s

